

Installing a new fish finder can be a bit intimidating if it’s your first time. Don’t be nervous though, it’s a relatively easy project that you should be able to tackle over a weekend. In this article you will find a list of tools and supplies you’ll need, plus tips and recommendations on installing a fish finder in the most common locations.
Recommended Tools & Supplies
Before you do anything, it’s a good idea to inspect your boat closely to see what you have to work with. Does your boat have pre-run accessory power wires you can hook up to? If not you will need to buy extra cable to run to the battery. What does your transom look like? If you have a jack plate, you can avoid drilling into your hull by mounting on or underneath it.
After you make a pre-install inspection, take a look at this list of items you might need and go buy them. Nothing chews up time like having to run to the hardware store multiple times per day.
- Fish Tape & Gloves – A fish tape tool is super helpful when running transducer and power cables from the head unit to the cranking battery. The fish tape is stiff flat steel that is flexible enough to be pushed and pulled down the wiring channel under the gunnels of most boats. The gloves are to protect your hands from fiberglass cuts.
- Cordless Drill & Drill Bits – A good drill with sharp bits will be utilized often during the install, like drilling your head unit mounting holes, and mounting the transducer.
- Masking Tape – Put masking tape over the areas you will be drilling holes into fiberglass. The tape prevents the gel coat from chipping and cracking when the drill bit bites into the hulls surface.
- Cable Ties & Cable Wraps – You will want lots of cable ties to secure and clean up your install. I also like the hook and loop style cable wraps for making a clean looking install. Take some pride in your fish finder install and route your cables in a professional looking manner.
- Shrink Tubing/Electrical Tape – Some people like to cover any wire splices with shrink tubing, for a moisture resistant connection. Electrical tape works just well, but can be messy and doesn’t look as professional.
- Heat Gun – The heat gun will shrink the tubing over the electrical connections. USE CAUTION when using the heat gun around fiberglass and boat carpet. Do not point the heat anywhere near the gel coat or the carpet. Boat carpet melts quite easily, and the gelcoat can be discolored or melted in a flash. I know from experience, so don’t be me!
- Inline Fuse Holder & Fuse Kit – All fish finder must use an inline fuse to protect the unit from voltage and current spikes. Blade style fuses work great, in either the ATO or Mini sizes. Refer to your user manual for the required amperage of the fuse. All major auto parts stores will have the fuses and fuse holders.
- Wire Stripper/Crimper – Basic hand tool to strip wires and crimp splice connections.
- Stainless Steel Hardware – When you have the unit location picked out, it’s time to run to the hardware store and buy some stainless steel machine screws and stainless steel nylon lock nuts. Bring your mounts with so you can pick out the right size. Get screws long enough that you will be able to reach underneath the boat or console.
- Unit Mounts – If you are doing a flush mount, you may need the accessory kit from the manufacturer, or you can MacGyver one up if you have shop skills. RAM has been the most popular mount style for a long time, but it’s worth looking at Kong or BallzOut as well. If you go with RAM make sure you get one of the larger ball sizes, otherwise they will be slipping and flopping under the weight of the unit.
- Transom Saver Block – These plastic blocks are most often used on the transoms of aluminum boats. The idea is you can screw this one block into the transom and be able to move the transducer around as needed to get the perfect placement.
Console Installation Tips
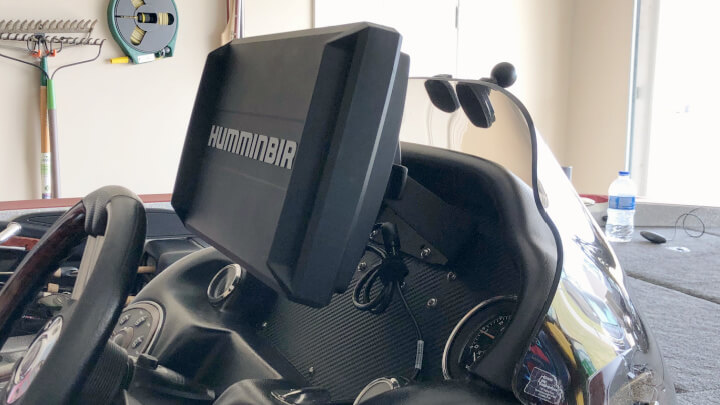
There are three basic methods of mounting a fish finder to your console (by the steering wheel). They are “In Dash” flush mounted, “Gimbal Mounted”, and using RAM/Kong/Other 3rd party mounts. Each method will work just fine; it all depends on how much space you have on the dash of your boat.
- In Dash – Flush mounted fish finders look great, but it doesn’t work on all boats. Many bass boats don’t have enough space for anything over a 7 inch unit. For bigger fish finders, this type of install works best on center console boats with large mounting surfaces. Unlike a bass boat, a center console has plenty of room to see the screen over the steering wheel.
- Gimbal Mounted – A gimbal bracket is the metal bracket with adjustable knobs that comes with many fish finders. This bracket is more easily mounted to small areas on a boat dash console. This also allows you to mount the unit a little higher and see the screen over the steering wheel. Some cheaper boats use plastic for the dash, but you can replace it with 1/8” aluminum plate cut to size. The other option is to mount the gimbal on top of your dash, like on a center console, or just inside the windshield on a v-hull. The great thing about a gimbal mounted fish finder is how sturdy it is. The drawback is it’s in a fixed position.
- RAM/Kong/3rd Party Mount – If you need flexibility on the console mounted unit, you’ll want to go with a 3rd party mount. You can mount a RAM or Kong mount just about anywhere, so long as you have a flat area to bolt down the base. The drawback to the RAM is the rubber balls can slip under heavy forces like you’d get in rough water. A Kong or Balzout mount will be more secured than a RAM, but at the expense of full positional flexibility.
Related: How to Read a Fish Finder
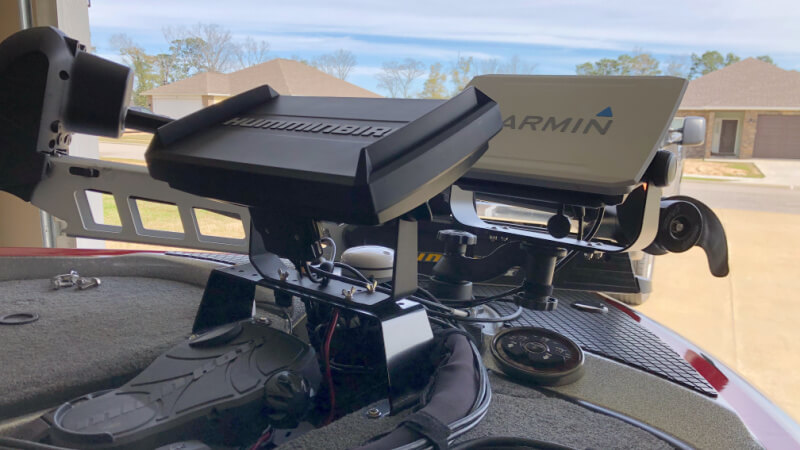
Bow Installation Tips
There are several good ways to mount your fish finder at the bow next to your trolling motor. Again, the method you choose will come down to the available space you have up front, and whether you want to spend more money on accessory mounts.
- Flush Mount – Some boats have a nice wedge shaped panel at the tip of the bow making it a convenient place to drop in a flush mounted fish finder. The drawback is this puts the unit at a fixed angle, and the farthest away from your eyes.
- Gimbal Mount – A gimbal mount at the bow raises the unit up several inches, which makes it easier to view. You can change the viewing angle of course, but once you place the bracket, it’s not movable. The downside to mounting this way is it can take up space on the deck where your rods might go.
- RAM/Kong/3rd Party Mount – If you don’t have a recessed foot pedal, then I would go with a third party mount. We really like the RAM-109HU mount for the bow. There are no rubber balls to slip when you hit a wave, and the unit can be moved around in a variety of positions. It also doesn’t take up much deck space. Kong mounts are pretty good on the bow if you want to spend the money.
- Bridge Mount – A bridge mount is exactly what it sounds like. You make or buy a bracket that bridges over the top of the trolling motor pedal recess, and mount the unit on top of it. Products like Dek-It and Wave Tamer make really nice brackets in different colors. This is the superior fish finder mounting option in our opinion. It puts the locator screen at a great height, and takes up the least amount of space on the casting deck.
Related: Side Imaging Tips & Tricks
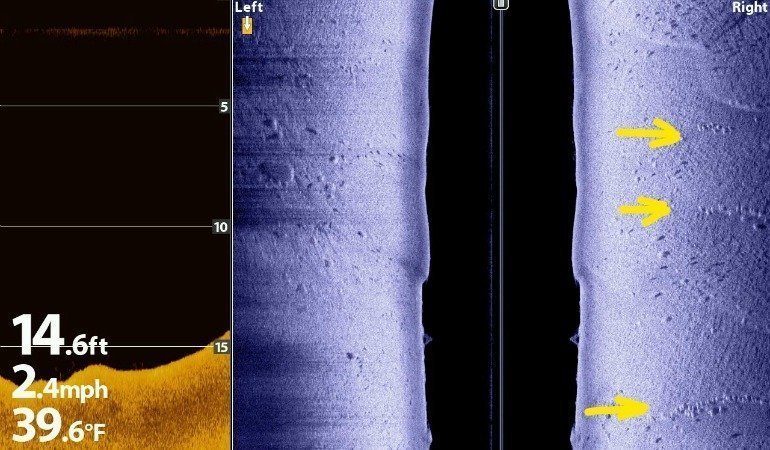
Transducer Installation Tips
Please read the manufacturer’s instructions first thing. If anything is unclear call the customer support. The transducer placement is key, and it too often gets messed up and then the person blames the manufacturer for a poor fish finder. Here are some general guidelines to get it right.
- Fiberglass Hulls – Try to map out the best transducer location ahead of time. Make sure there are no obstructions to the left, right, or directly below the transducer. Obstructions include mesh livewell intakes, temp sensors, speed sensors, strakes, jack plates, and the motor itself. We recommend jackplate mounting for larger imaging transducers, and standard transom mounting with smaller models. When you have a god spot picked out, place masking tape over the area. You can mark the holes to drill and the tape prevents gel coat chipping from the drill bit.
- Transducer Shield and Saver makes really nice products to protect your transducers. They are expensive parts, but they can very well save you from having to buy new transducer if you bump it off a stump.
- If you want high speed 2D sonar readings, you may need to get a “Shoot Through the Hull” transducer and a splitter cable. You would epoxy the Shoot Thru transducer into the bilge area, and the splitter will send the correct readings to the fish finder.
- Aluminum Hulls – All the same guidelines apply to Aluminum boats, but for a few exceptions. Aluminum hulls usually have welded or riveted joints in the hull. You want to avoid lining the transducer up with any of those joints because they will cause air bubble turbulence and really wash out your sonar image. Instead of epoxying a shoot through hull transducer, you may need the “Alumaducer”. The reason is regular transducers do not read well through aluminum, but the Alumaducer is especially designed to transmit and receive through aluminum hulls. Check out the install video for more.
- Trolling Motor Mounted – You can easily mount a transducer to a trolling motor using an adapter bracket. Some companies have kits you can buy (although not strong designs), and some fish finders even come with a plastic mount for either transom or trolling motor. The other option is to buy another expensive Transducer Shield & Saver bracket, pricey but they perfectly fit each transducer to the trolling motor.
Great information and very thorough .