

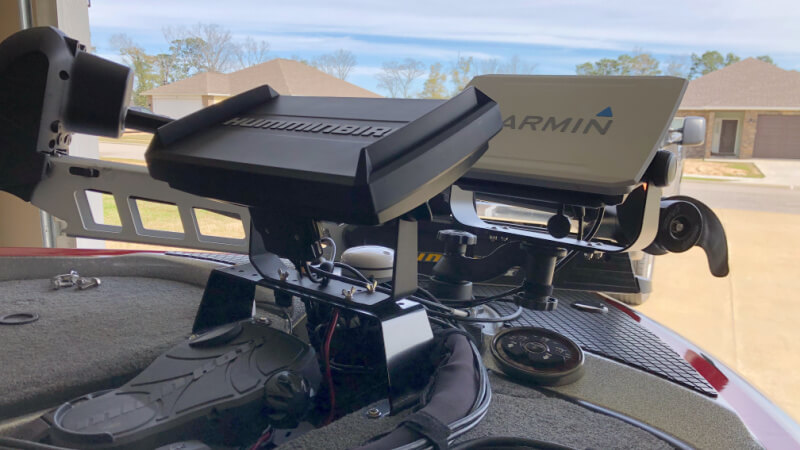
In 2005, Humminbird created a revolution in the fishing world by introducing the first consumer grade Side Imaging fish finders. The advantages of the technology caught on quickly with anglers, and now over ten years later, side viewing sonar is found in nearly every brand and size of fish finders on the market.
Now they have done it again with MEGA Side Imaging. MEGA is the first Megahertz imaging fish finder to be made for the consumer angler. Megahertz frequencies provide stronger, more clear sonar returns for the most detailed side images yet. This really is the new standard for clear scanning side imaging, and we as anglers will benefit greatly.
But even after all these years, many people who buy a side imaging capable unit don’t know how to operate it or understand how to read it. We’ve set out to change that with this Side Imaging Tutorial. It doesn’t matter whether it is Side Imaging vs Lowrance Side Scan vs Garmin SideVü, the fundamentals are the same, and this tutorial will help you learn to use the fish finder that you spent your hard-earned money on.
Step 1 – Get the Installation Right
The first thing you must pay close attention to with any fish finder is your installation. Without a clean and proper install, you will be handicapping yourself right from the start, leading to unnecessary confusion and frustration. Get these basics right and you are on your way to awesome imaging performance.
Transducer Placement is Key
I don’t care where or how you mount the unit itself, because the most important step in the installation of your Side Imaging fish finder is the transducer placement. A bad transducer placement will doom your images from the start, leaving you frustrated without even knowing why.
You have several mounting options available to you. They all will work, but some are a little more “clean” than others. You can choose to use the hardware that came with your unit or buy aftermarket mounts for alternate placements.
The transducer MUST have a clear view from level, from side to side completely. There should not be any obstructions like motor mounts, jack plates, or the hull if it curves outward.
Here are some of the different places to mount the transducer:
- Transom – Drill holes in your aluminum or fiberglass hull to mount the transducer brackets. It’s critical you get it right the first time!
- Side of Jackplate – You will have to drill a few hole through the aluminum jack plate, but it is a convenient location to mount a transducer. If you mount too high, you can sometimes get a sonar echo interference bouncing around inside the jackplate.
- Under Jackplate – Depending on the jackplate, there can be a nice open area of hull to mount the transducer. Alternately, you can install a Hole Shot Plate, and buy a wedge that bolts onto the plate.
- Under the “Step” – Some larger boats (like Rangers) have a large step in the hull underneath the motor and above the pad. This can be a secure place to mount the transducer that gets nice clean water flow.
- Trolling Motor – Some people like having side imaging at the trolling motor. I prefer 360 Imaging at the bow, but with some practice, SI can be a useful tool at slow speeds.
Tip #1 – If you are mounting to your transom, it would be wise to consider a “Spring Back Bracket” from Transducer Shield. Model SBB-4 works with any brand’s transducer and costs just $69.95, which is a fraction of what a new transducer would cost if you hit something and it breaks. Consider it an insurance policy on your transducer.
Tip #2 – The other transom mounting option that works well on aluminum boats is a “Stern Saver” block. This polyethylene block gets epoxied to your transom, and then you screw into the block to mount the transducer. This allows you to try different transducer placements, and adjustments, without having to drill holes in your hull.
Clean Power
Clean wiring on your install will ensure that you get clean and strong power to your unit, which helps provide your unit with clean, noise-free imaging.
In the best scenario, you will run your power wires directly to the battery, and solder all terminal connections you make to the cable. Personally, I’ve had good luck with regular crimped connectors and splice joints, but soldering will give you the best connections. Also, make sure to install the inline fuse per your fish finder’s installation guide.
Sometimes it’s difficult to directly wire to the battery. If there are accessory power wires near your installation point, first check the wire gauge being used. If it’s less than 18awg, then you should really try to direct wire. 16-14AWG is best, especially for the power-hungry 12 inch and larger fish finders, but is not used by most boat manufacturers.
GPS Receiver Location
It used to be that all GPS fishfinder combos came with an external GPS “puck”. Those days are gone as manufacturers have opted to go with the simpler internal GPS antenna that is built onboard the unit.
This means that unless you buy an external receiver to a place near your transducer, there will be an x-y discrepancy between where your cursor marks an object and where the object actually is.
Tip #3 – If it is absolutely important for you to have the most accurate waypoints possible (which it should be), then you should buy an external GPS receiver and mount it as close to your transducer as possible. This will ensure that your waypoints will be as close to what you scanned as possible.
If you choose to stick with the internal GPS, you will need to get good at marking spots with the cursor slightly behind where you want the waypoint to compensate for the distance offset. This technique takes lots of trial and error to get good at.
Step 2: Use Default Settings, Scan Known Objects
You may be tempted to start fiddling with the sensitivity and contrast the moment you get on the water, but it would best if you left everything at the default until you have some time at the wheel under your belt. Drive past visible objects like boat ramps, bridge pilings, rocks, and grass beds to begin to learn what underwater objects look like in the side view.
Tip #4 – You should run side imaging while idling at speeds from 3-6 mph for best results.
Tip #5 – Set the Range to 75-100 feet to start with so that you get good detail to study on your first scans.
Only once you understand what you are seeing on your side scan display, should you start experimenting with the settings controls. Here is a quick definition of each one.
- Sensitivity & Contrast – Image processing that adjusts the brightness ratios between light and dark colors, of the sonar return displayed on the screen, also known as “white level”. This is useful in distinguishing suspended fish from background objects.
- Speed – The scroll speed of the side images. The rule of thumb is to leave at default speed of 5 when idling between 3 and 5mph, then adjust up or down to correspond with your boat speed.
- Range – Sets the distance each side is displayed on the screen. There are only so many pixels in a screen, so a wider range has to compress the sonar data into the same number of pixels as a narrow range. A narrower range will therefore be more detailed, at the expense of seeing out farther.
- Contour Mode – Removes the water column from the side image display and stiches the left and right image together for a realistic, aerial style picture of the bottom.
- Left Side/Right Side Only – Displays only the left or right side image in the available screen space.
- Color Palette – The fish finder processes the sonar data and applies a color palette based on the strength of the signal.
Step 3: Optimize with Sonar Recordings
It is a little-known fact that the sonar recording function is the single most useful tool for learning and optimizing your side imaging fish finder. It really is amazing that more people don’t know to use recordings in this way, and we want to help spread the word.
How exactly does a sonar recording help us as anglers learning to read side imaging? It helps by recording ALL the sonar data into a file so that you can replay it full screen like a movie at a later time. It also allows you to change all the settings to see how it changes the image. Recordings make it so much easier to experiment with the settings and find out how each one affects the picture in live time.
Here are some things to play around with after you’ve made some good sonar recordings.
Experiment with Sensitivity, Contrast, Sharpness, and Speed
Sensitivity – When the sensitivity is turned too high, the image gets washed out. When set too low you will lose definition of the return. It’s best to leave these at the default until you can make some recordings and experiment with different combinations.
Contrast – Contrast is also known as “white level”, and adjusts the overall level of light on the image. Higher contrast amplifies the colors, and when set too high it washes out the detail, while too low of contrast dims everything out.
Sharpness – The sharpness setting attempts to enhance the edges of objects to make them stand out and more detailed. As you increase Sharpness, your image will become grainier, but it can be useful to reveal fish that are hugging the bottom. More Info – jasonhalfenoutdoors.com
Scroll Speed – A fast scroll speed when the boat is moving very slowly will result in a blurry or smeared looking image. A slow scroll speed while moving faster will result in poor images from sonar data not being refreshed on the screen. If you use SI at the trolling motor, you will want to slow it all the way down to 1 or 2 because you are moving so slowly. You can achieve decent images with some practice, but I vastly prefer 360 Imaging over SI at the bow.
Utilize the Range Function
The range is how far to each side you want the display to show sonar data. The wider the range, the more data is packed into the view. The narrower the range, the more the data can be shown on more pixels. Your range should depend on what type of contours and structure you are scanning.
It is far more efficient to scan large shallow flats with the range set to 100 feet or more. Humminbird especially is known for having excellent shallow water side-scanning abilities in the 455 kHz frequency. Once you zero in on some areas of interest, then you could narrow the range for more detail.
Tip #6 – When scanning points and ledges it’s important to narrow the range to the effective distance of the sonar, so you are only viewing the area of interest and not wasting screen space. Try using a range of 40-80 feet per side the next time you are looking for fish on structure and you will be amazed at how much easier it is to see actual fish among the objects and bottom.
455 vs 800 kHz vs 1.2 Mega Imaging Frequencies
Most, but not all, side imaging units have an 800 kHz frequency option, yet many anglers don’t even realize they have this tool in their arsenal. 455 kHz provides the greater coverage area, while 800 kHz provides the sharpest images.
Think of it this way; the fish finder can produce a sonar signal with only so much power, and that power gets spread out over the coverage area. Therefore when set at 800 kHz, more energy is directed at a narrower area, providing more detailed return signals and images. More Info – Westernbass.com
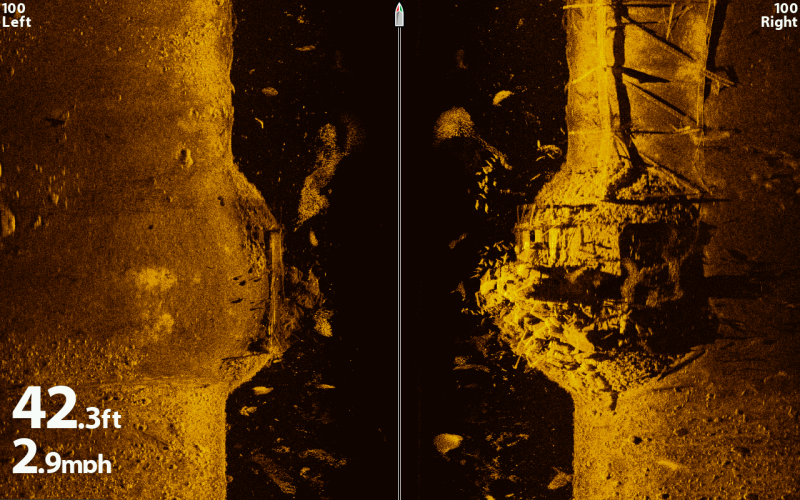
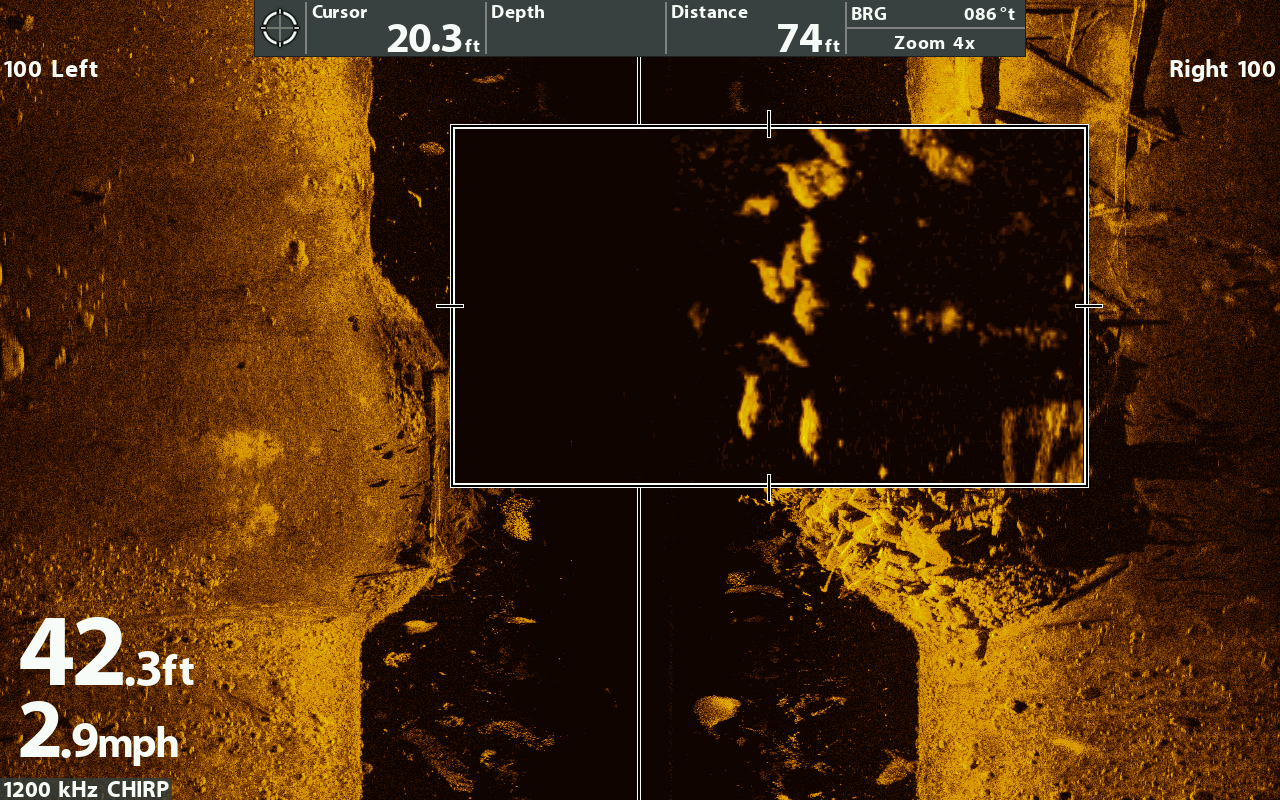
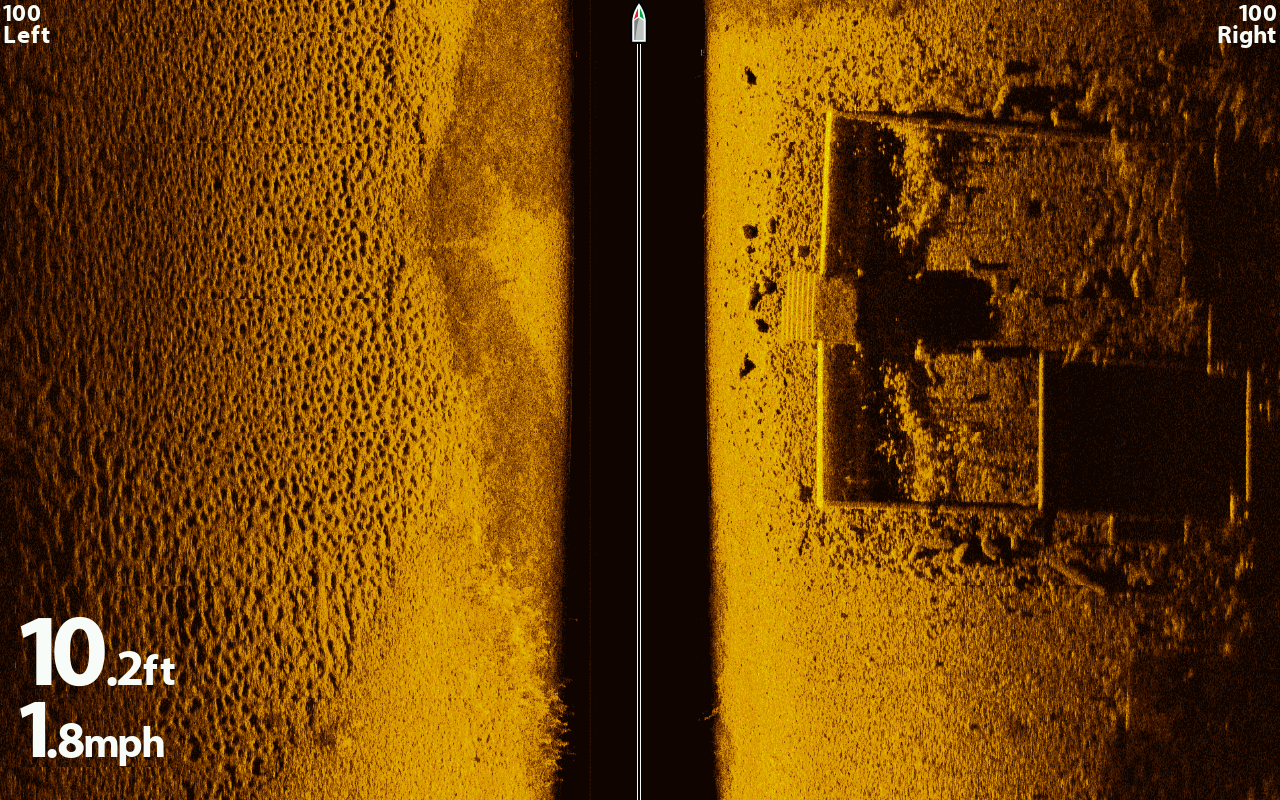
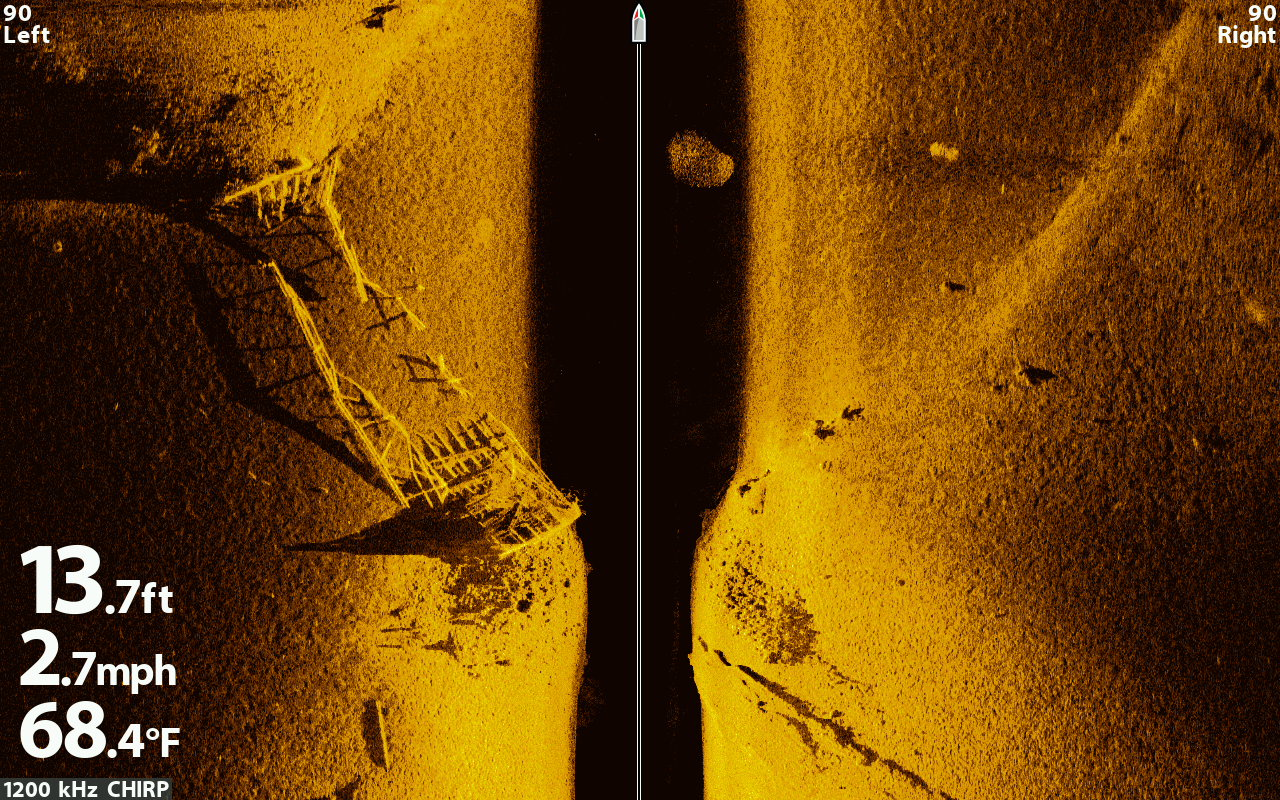
Now we also have a new frequency (1200kHz) to utilize from Humminbird. 1.2 Megahertz is even more powerful than 800 kHz, and judging by the screenshots released so far, it is clearly superior to the other frequencies in terms of image quality. Humminbird says MEGA Imaging has a range of 125 feet left, and 125 feet right, which is awesome, as most people never scanned beyond that in the first place. Check out some of the MEGA Side Imaging screenshots that have been published so far.
Tip #7 – 455 kHz is great for many things like scanning huge flats for weedbeds and isolated pieces of cover, or just trying to cover as much water as possible.
Tip #8 – 800 kHz is great for making second passes over areas of interest to get the best possible view of what’s going on in the area. 800 kHz can help reveal individual fish that may not show up on your initial pass.
Experiment with Color Palettes
Different color palettes will show the bottom composition differently, so this is another setting to play with on your recordings to find one that works best for you.
Bottom transitions like clay points, shell beds, gravel, and rock will all look a little different in each color palette. Experienced users will know to switch to certain color palettes when they are keyed in on a specific pattern.
View the Side of Interest Only
To display the most data over the entire screen, it can be useful to set the unit to full-screen side imaging and then set the display to show either the Left Side only or Right Side only. This allows more of the sonar data to be displayed in the available screen space.
For example, let’s say you are out scanning ledges looking for bait and a jackpot mega school of largemouth bass. When you are scanning with the ledge on the port side, set the view to Left Side only to maximize what you can see. Then change to the Right Side only when coming down the other side of a ledge on your Starboard.
Troubleshooting
If you followed all of these steps and still are having trouble, or aren’t getting the images you think you should, there are some places you can go to seek advice from many experienced users. To get the best help for your situation, make sure you post a photo of your transducer install, fish finder model, and some screenshots.
- Ask Us a Question – Feel free to send us questions about your installation. Please send links to your pictures so we can try to diagnose problems.
- Garmin Forum on Bass Boat Central
- Lowrance Forum on Bass Boat Central
- Humminbird Forum on Bass Boat Central
- Humminbird Group on Facebook
Summary
To conclude this SI Tutorial, we want you to remember 3 key points when you are beginning to learn Humminbird Side Imaging, Lowrance Side Scan, or Garmin SideVü, for whichever brand or model fish finder you have:
- Nail your installation – Spend time learning the hull of your boat, visualize where the side imaging beams will be passing through, as well as your wire routing, to get the best and cleanest possible install. This will ensure you are set up right from the get go.
- Scan known objects and structure first – Doing this helps you translate and visualize what objects look like on your screen.
- Make Sonar Recordings – When you find some interesting bottom structure with fish and bait around it, make some recordings in both 455 and 800 kHz. This will allow you to replay the data and experiment with settings once you are done fishing for the day.
The more time you can spend making recordings around areas where you caught fish, the faster you will become an expert in using the technology to find fish in both familiar and new water. Good luck out there, we hope you enjoy your side imaging fish finder.
Related Posts
- Top Fish Finder Combos
- Top Kayak Fish Finders
- Humminbird Helix 7 SI GPS Review
- Lowrance Elite-7 Ti Totalscan Review
- Garmin Striker 7sv Review

Unfortunately, your recommendation of soldering connections is misguided. Soldering wires is only appropriate to a PCB, where the wire is also strain-relived when exiting the housing or potting compound. This is because the solder wicks up the wire, creating stress points that fracture a stranded wire strand by strand until it fails. Not to mention a soldered connection is less of a conductor than a crimped connection.
All factory terminations in a wire harnesses worth noting are crimped. You will not find wires soldered together in cars, airplanes, or any other vehicle for reliability reasons. If Boeing thought a soldered termination was better, they would do it. They do not, however. I build PCB components for space flight companies, and the same rule exists.
Most consumers are ignorant to proper crimping methods, so I understand the recommendation to solder instead. Most people get a cheap crimper and are unaware as to how much force they should apply. A racheting crimper takes some of the guesswork out, but the user is still responsible for selecting the appropriates dies. If corrosion resistance is desired, heat shrink terminals are available, as is terminal/contact grease, which can be applied to the wire before crimping. There multitudes of options, and ebay is a good place to aquire smaller quantities of high quality termination hardware.
Good info, thanks Dan.