


After using the Humminbird Bow 360 system for over 3 years, I’m convinced it is the most underrated piece of fishing equipment on the market. I honestly wouldn’t trade it for anything. I’d rather have smaller screens and a 360 than bigger screens without it.
With hundreds of 360 hours under my belt, I am very qualified in discussing the many benefits, as well as the limitations of this revolutionary sonar (pun intended). In this Humminbird Bow 360 review, you’ll see exactly why and how I use 360 to be a better and more efficient fisherman.
How it Works
360 Imaging is basically a rotating side imaging transducer. Where Side Imaging scrolls from top to bottom to create the image, 360 “scrolls” in a circle, creating an image of the water column around the boat.
Inside the transducer pod is several sonar imaging crystals rotating in a bath of oil. The rotation creates the circular sweep and software paints it onto the screen as an image. If you understand side imaging, you will quickly see how similar it is.
Installation & Items Needed
Installation of a Bow 360 system is extremely easy. The entire system consists of three components. There is the transducer pod on a shaft, the mounting bracket, and a GPS heading sensor.
The transducer pod is attached to a composite shaft, which attaches to the trolling motor via a locking bracket on an aluminum bracket. The teardrop collar above the pod must face straight forward in line with the center-line of the boat. The pod should be a few inches above the trolling motor housing, just enough to clear the prop.
There are two cables coming out of the shaft, one for power, the other is Ethernet. Take care when routing the cables along the trolling motor, there needs to be slack for deploying and retracting the trolling motor.
The GPS heading sensor tells the unit where to place the waypoints on the 360 sweep view. Mount the GPS puck in close vicinity to the 360 pod, and then connect it to the bow fish finder.
Once the pod and GPS puck are in good locations, and the cables are routed, you can connect it to your fish finder or network. The 360 can be run directly to the unit, or to the 5 Port Ethernet Switch. If you fish with a partner, a networked setup is perfect, as then both you and your back seat partner can view the 360 sweep.
- AS 360 TM or AS 360 TM ULTREX (transducer pod with cables and mount)
- Inline Fuse Holder with 1A Fuse
- 360 Capable fish finder(s)
- AS ETH 5PXG – 5 Port Ethernet Switch
- AS EC QDE – Ethernet Adapter Cable (1 for each networked Fish Finder)
- AS EC 10E – 10 foot Ethernet Cable (1 for each networked Fish Finder)
Benefits of Bow 360
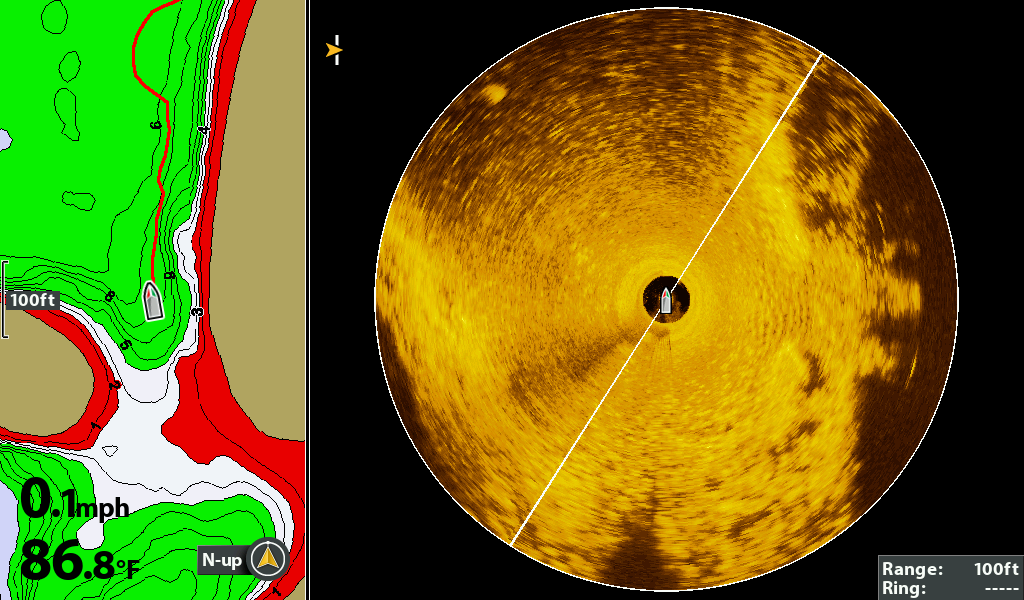
See all Around the Boat – The most obvious benefit to Bow 360 is being able to see the water column and lake bottom in all directions around the boat. Even better is it works best while stationary or moving slowly like you do when using the trolling motor. After fishing with a Bow 360 for a while, you will quite literally feel like you are fishing blind without it.
See Targets Before Reaching Them – With 360 on the bow, and using 360 Navigation with waypoints, you can slowly approach structure without having to drive over them and throw out a marker buoy, potentially spooking fish.
Line up Every Cast – With 360 Imaging, every cast can be productive. You don’t have to guess where the rock pile, grass line, or brush pile is, or search for it with your bait. You can line up every single cast and put your bait directly into the productive zones where fish live.

Follow Transition Lines – Points, ledges, humps, and reefs will all display a distinctive color change on the 360 sweep. Usually this is a combination of rising terrain and harder bottom, similar as you see on Side Imaging. 360 makes it dead simple to see you are in good casting position to whatever structure you are fishing.
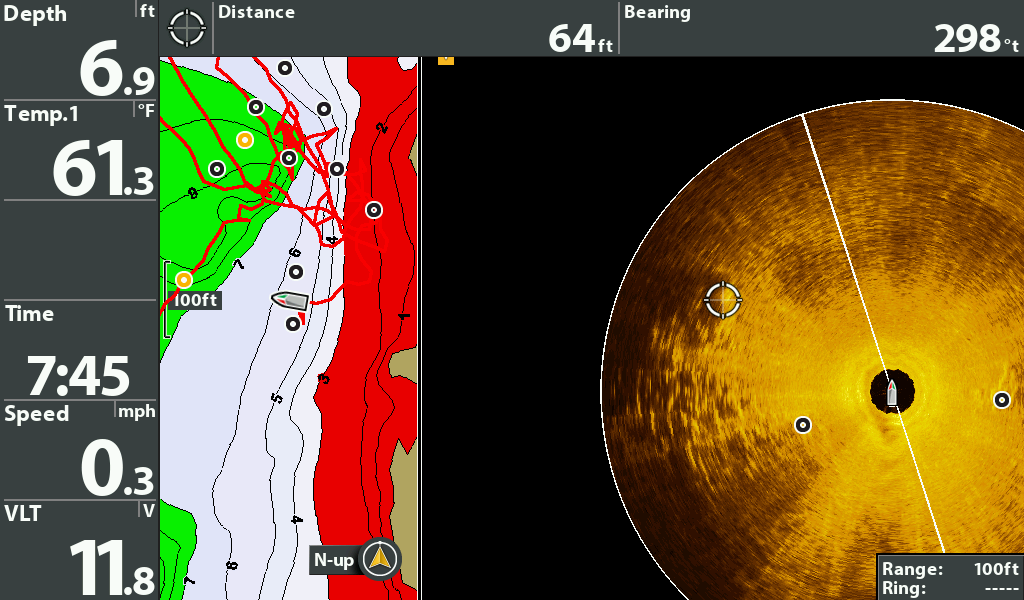
See the Grass Line – Fishing submerged grass lines with 360 is fantastic. Just as you can see hardness changes, you see clearly see the weed and grass line around the boat. Turns, points, and holes in the grass become visible without you ever having to drive over the grass beds.
Reveal Irregularities – I am constantly surprised at the discoveries I make simply while fishing along the bank or ledge. I’ve found shell beds, bream beds, brush, and rock piles that I never would have known were there without 360.
Follow Bait and Schools of Fish – There have been numerous occasions where bait balls show up on the 360 sweep, and their movements can be tracked with every refresh. In open water you can see the bait as well as fish following. You can also literally watch fish move in and around brush piles by looking for the telltale white marks that appear and disappear.
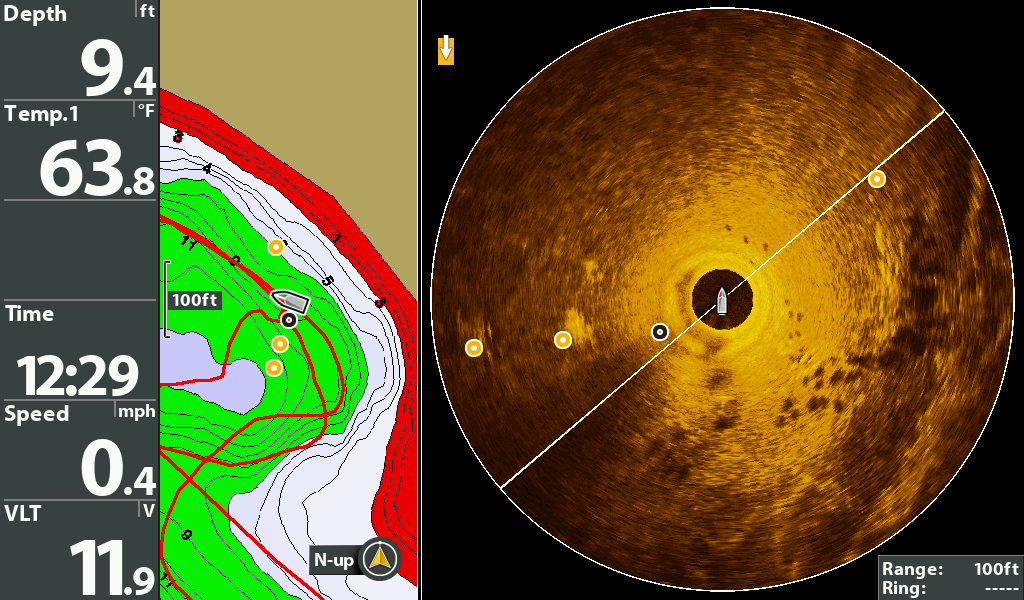
See Beds – Bream beds (and the fish in them) show up extremely well on 360 Imaging. You can mark them using Side Imaging, then pull up to and fish them using the 360. There have been many occasions where I come across random colonies of bream beds on huge flats, or along the bank. These are always good spots to find big largemouth bass from Spring through Summer. The image below were Spotted bass beds next to brush piles.
Limitations of Bow 360
- Motor Compatibility – Bow 360 is designed to work best with foot control style Minn Kota trolling motors. There are no official accessories for the Terrova and Ulterra electric steer/electric trim motors. However, there are aftermarket products, like Cumberland Crappie mount, that you can buy to use 360 alongside those motors. Motor Guide motors will need a special adapter for the bracket to fit the motor shaft.
- Image Quality – Bow 360 runs at 455 kHz, the same as your basic Side and Down Imaging. You will notice that screenshot images are not as clear or sharp as Down or Side Imaging. Where normal Imaging is painting thin straight lines across the screen, the 360 is displaying a narrow wedge. Due to that narrow pie slice shape, the further away from the center of the sweep, the more potential there is for blur. Don’t let this deter you, the imaging provides plenty of detail and information.
- Not “Live” – Just like Side Imaging, the 360 sweep is showing you history. You will see that schools of bait and fish will have moved a little each time the screen is repainted.
- Limited Side by Side 2D – For some unknown technical reason, the 2D sonar runs slower than normal when split screen with 360, to the point where it’s almost unusable. Down Imaging won’t split screen at all since they run on the same frequency. If you find having 2D Sonar or Down Imaging simultaneous to the 360 sweep, you should run a separate small secondary unit.
- Not Quite as Useful in Deep Water – While 360 Imaging excels in water less than 20 feet, but is still useful in water much deeper, and even in open water.
- Not as Useful in Heavy Vegetation – Bow 360 is not going to be much help when plowing through heavy grass mats. As you can imagine, the vegetation blocks the 360 sweep and can get wrapped up on the pod shaft. Subsurface grass is a different story; the pod can “see” over the tops and show you holes and cuts in the grass bed.
360 vs Panoptix
The most commonly compared product to the Humminbird 360 is the Garmin Panoptix. It is a ridiculous comparison in my opinion, as they are completely different types of sonar technology. Since they are the two most popular forward looking sonar systems being used, it is useful to discuss if you’re looking to buy one or the other.
- 360 Imaging – Constant imaging sweep for wherever you set it (full circle or a sector) that is hands free and always refreshing the view.
- Panoptix – Forward looking “live” 2D sonar. Live just means rather than scrolling across the screen, the sonar is constantly refreshed. Must be pointed in the direction of your casts.
Shallow Fishing: Bow 360 – When fishing shallow, you are typically making a high number of casts to specific targets and areas. For Panoptix to work it needs to be lined up with your target and it simply doesn’t make sense to spend all that time lining up the transducer to make a cast.
360 Imaging on the other hand, excels in shallow water. Whether you’re flipping and pitching or casting and cranking, just let the 360 sweep and you can hit every visible target and anything you can’t see that is revealed by the 360. Objects like wood, grass, and rocks are immediately visible to you and all you have to do is cast to them as you go.
Deep Fishing: Panoptix – The scenario where Panoptix works best is in deeper water, targeting specific pieces of structure. Things like rock piles, brush piles, humps, and points could all be fished very effectively with Panoptix. The main drawback being the transducer must be pointed toward the structure. You can sweep the transducer manually to help line up your casts. This forum post is an excellent example of how this might work for you.
Vertical Fishing: Panoptix – The most obvious use would be drop shotting. Assuming you have the downward facing Panoptix transducer, it will provide live sonar returns of your rig, fish within the cone, and how they are responding to the lure. The thing is, you can already do this with 2D sonar on fast scroll as proven by the professional bass tours. The only difference is 2D scrolls across the screen while Panoptix is a “live view”.
Ultra-Clear Water: Panoptix – Garmin really plays up the fact that Panoptix can show fish following your lure. It’s not clear how realistic of frequent this scenario would play out on the water. Most likely it would work best in clear waters where fish can see and follow your presentation. It could work well on spotted bass and smallmouth fisheries.
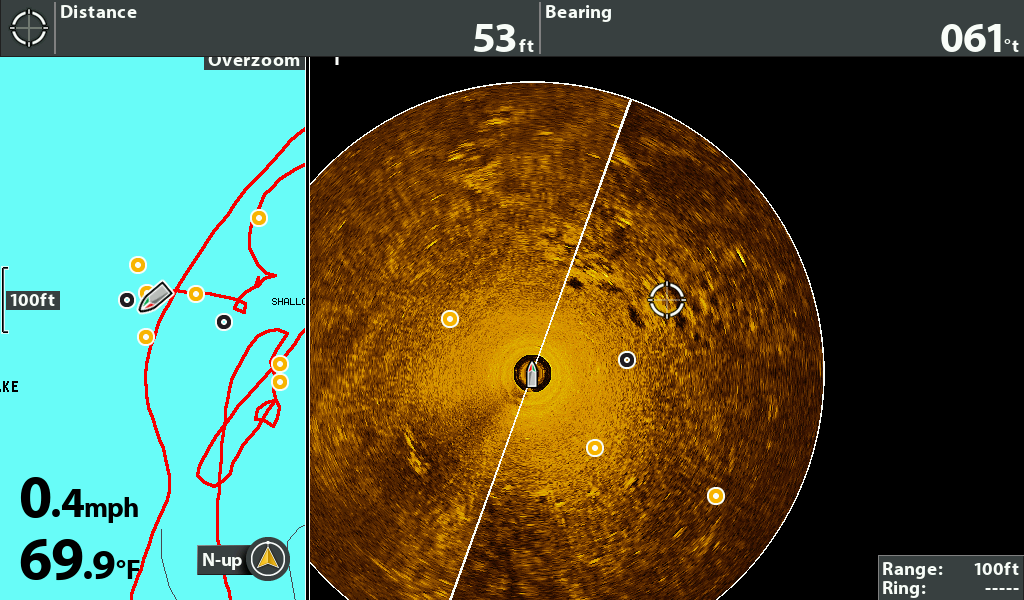
Grass Fishing: Bow 360 – As mentioned before, the 360 sweep provides constantly updating images of the grass around you. This information allows you to make precise casts along edges, pitch into holes, see turns, points, and isolated clumps that big fish love to hang around.
Versatility: Bow 360 – I am definitely biased, since I’ve only used 360, but I’ve tried to do thorough research and an honest comparison here. While Panoptix definitely has its uses, my feeling is that 360 is the more versatile tool for freshwater fishing.
Price: Bow 360 – The MSRP of Bow 360 is currently equal to the price of a PS21 Panoptix transducer, which is the most common for use on the trolling motor. For both systems you need a compatible unit capable of displaying the sonar.
Conclusion – Should you Get a Bow 360?
While the Humminbird Bow 360 is a relatively expensive accessory, it has been worth every penny. If you are seriously considering it but still unsure, the best you could do would be to spend half a day in the boat of someone who already has it. If you understand side and down imaging, you will quickly catch on to the power of 360 Imaging.
There is very little time wasted searching for the structure with casts or marker buoys. Knowing what was in front of me, and where, provides the ability to make precise casts every time. Bow 360 has been a game changer in my fishing, and I would feel like I was blind without one now.
Check Price on: Cabelas.com

Hello friend,
The point view of limited budget the AS 360 still worth it? I can get a used 360 pod for about 250/300$, i know the MEGA 360 is muchhhhh better, but is 1400/1700$ new.
Or is better to forget the old 360 and run a MSI?
Last question: I need the GPS head unit or the 360 Pod is enough?
best regards and thanks
Good question… if it was me (I fish bass and crappie/bluegill mostly) I would rather have a used AS 360 than nothing, and it’s also more useful than MSI on the trolling motor. I got a lot of use out of my AS 360 and felt like it was my secret weapon because hardly anyone was using it then. You need a compatible head unit, an Ethernet dongle if it’s on a Helix, and the pod should come with a heading sensor.
very disappointed with my mega 360.All the screws on the unit have rusted terribly and the 2 sensors that tells if it is in water rusted also so the unit tells me no contact.Unit 2 years old and never seen salt or brackish water
What you are describing is exactly what happens when there is a ground issue on the boat. Somewhere in your boat the ground is not connected properly and you’re getting electrolysis on the screws and water sensors.
Great information…..now lets think ice fishing. I want to find fish and downward sonar or flasher is very limiting. I want to be able to scout on my snowmobile, drill a hole, and get a good picture of the terrain around me and possibly fish….without drilling 10 holes or use camera that has limited visibility. Which one would work best?
Great question! To get the “terrain”, you get by far get a better idea of that with a 360 (100ft+ range), it’s imaging after all and not limited by water clarity like a camera would. You could look for weed beds, rock piles, bottom transitions, and possibly see fish, then mark the waypoints on the screen then go drill the next hole. You could do the same with Livescope but the effective range is limited from what I have seen (40-50ft?), but you would benefit from the live sonar aspect.
Yeah ,I have a question.could this be modified for ice fishing? I’m a ice fishing guy this looks promising.what do you think of a mobile device???
Absolutely! You will have to get creative and make a tripod that holds the 360 shaft over the ice. Search some fishing forums, I know it’s been done before.
Which Hummingbird graph works best with the “Ultrex” 360?
Any Helix G3N or SOLIX G2 units will be compatible with MEGA 360. A bigger screen will show detail better, but it depends on your budget how big to go.
I saw a post where someone used the 360 on a 4-wheeler for ice fishing. I am very interested in this, and I am curious if you would know if there are any limitations that the 360 might have. Such as cold temperatures for the sonar unit, or if there might be a better option that is coming out.
Thanks!
Aaron
I actually have seen what you are describing. There is no reason that shouldn’t work with a 360. However, there is a new version out – MEGA 360 – that is a little different. It has an externally rotating transducer, so I suppose there could be a slight chance of it freezing up on the coldest days. It look like it has some drain holes on it so I doubt that would happen.
What about the transom version of the 360?
How does it compare with a bow mounted unit in terms of strengths, weaknesses, best uses….
The transom version came out before the trolling motor version, yet it’s the least popular. Part of it is price, part of it is 360 is most useful at the bow where you’re casting forward. That said, lots of people like the transom 360 for fishing while anchored. Fishing for catfish, hybrids, or any kind of schooling fish – you can watch fish movement on the 360 and relate their position to structure. The drawbacks are having a heavy accessory on the back of your boat, and it takes time to stow and deploy every time you change fishing spots.
You should also know that MEGA 360 is replacing the AS 360, and there will not be a transom version (at least nothing announced yet).
Very useful information. This is just what I needed to make my decision.
I see from the compatibility chart that this is not compatible with the helix 7 series?
The HELIX 7 G2N models are compatible, but not the G2. The unit has to have networking capability to be compatible.